Azure Active Directory
Introduction
TRiA supports using Azure Active Directory authentication as a valid authentication server. Because the authentication flow for Azure Active Directory is so different from typical LDAP and Active Directory implementations, changes must be made within the Azure Portal to configure the Azure Active Directory for use with external applications.
Note: You will need Administrative credentials to your Azure cloud portal.
New App Registration
If you have an existing App Registration, and it is of the “Web app / API” type that you’d like to use, you can skip this section and move on to the Existing App Registration
From within portal.azure.com, click the
Azure Active Directoryin the side navigation panel, or find it within ‘All Services’Select ‘App Registrations’, and in the content pane, select
New application registrationEnter whatever you like for the name, but the ‘Application Type’ should be “Web app / API”. For Sign-on URL, enter https://tria.connectria.com/. If you’re serving your TRiA application from another hostname, enter that here instead.
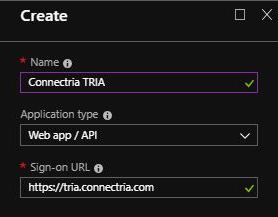
Click
CreateThe app should be created, and you should arrive at an overview screen of the application. Make note of the
Application IDon this page, as we will need it for configuration.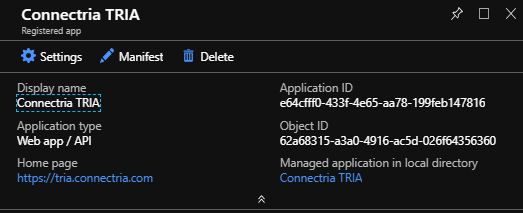
Click the ‘Settings’ button to see the settings, and then click ‘Reply URLs’. Add the following values, (be sure to replace ‘tria.connectria.com’ with the correct values for your installation) and click
Save: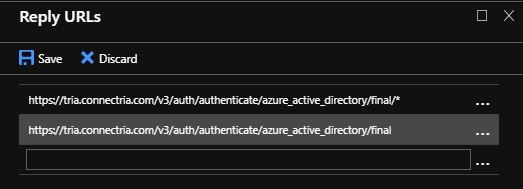
Re-visit the ‘Settings’ pane, and this time select
Keys. Populate the key description, select a duration, then click Save. Make note of the key that is created, as it won’t be visible again after this step is completed.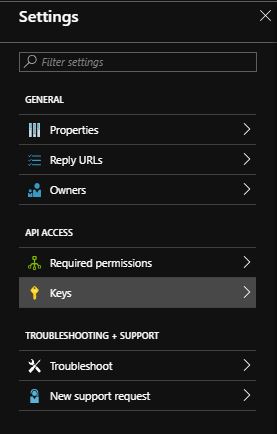
At this point, the Azure Active Directory should be viably set up for use with TRiA. Visit the
Identity Management section, create a new Authentication Server, making certain to select the ‘Azure
Active Directory’ type when you do, and use the values you noted above where needed.
For more detailed instruction, Click Here
Existing App Registration
If you have more than one Active Directory instance on portal.azure.com, select it from the top-right corner of Azure portal page, and make note of the domain to which it is associated (e.g., ‘tria.connectria.com’)
Click ‘Azure Active Directory’ from the left side panel (if it is present), or find it within ‘All Services’.
Select the ‘App Registration’ from the list of App Registrations to view its property page.
From the App Registration detail page, make note of the
Application Id, and ensure that it’s ‘Application type’ isWeb app / API.Click the
Settingsbutton, then in theSettingspane select ‘Reply URLs’. Add the following values if they do not already exist (being sure to replace ‘tria.connectria.com’ for the correct domain for your installation) , and clickSave
Re-visit the ‘Settings’ pane, and this time select
Keys. Populate the key description, select a duration, then click Save. Make note of the key that is created, as it won’t be visible again after this step is completed.
Note: You _can_ use an existing key if you already have created one and know its secret, but creating a new key for TRiA is recommended.
At this point, the Azure Active Directory should be viably set up for use with TRiA. Visit the
Identity Management section, create a new Authentication Server, making certain to select the ‘Azure
Active Directory’ type when you do, and use the values you noted above where needed.
For more detailed instruction, Click Here