Adding Microsoft Azure Account
Microsoft Azure (Azure) is one of the world’s leading public cloud providers and they offer a variety of cloud services. You can add an Azure account into TRiA following these steps.
Steps
1.) Azure Dashboard
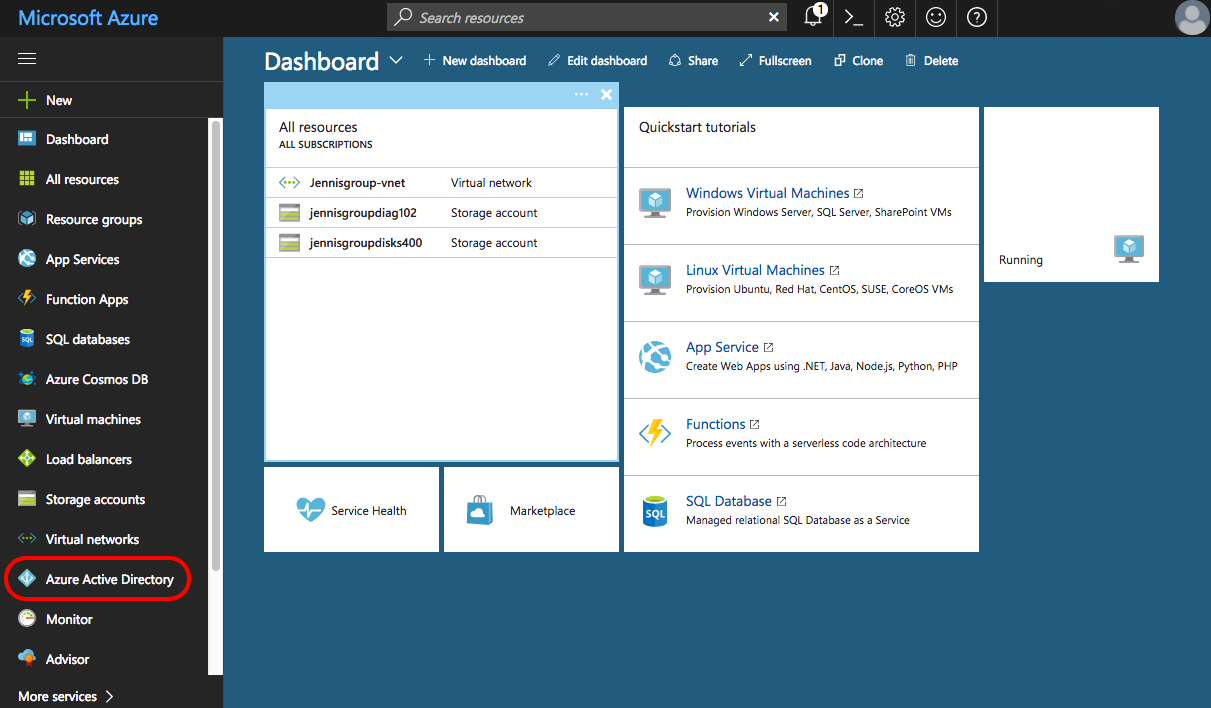
Azure Active Directory. Login to the Azure Dashboard. Access the Azure Active Directory service from the left-hand side navigation.
2.) Azure Active Directory
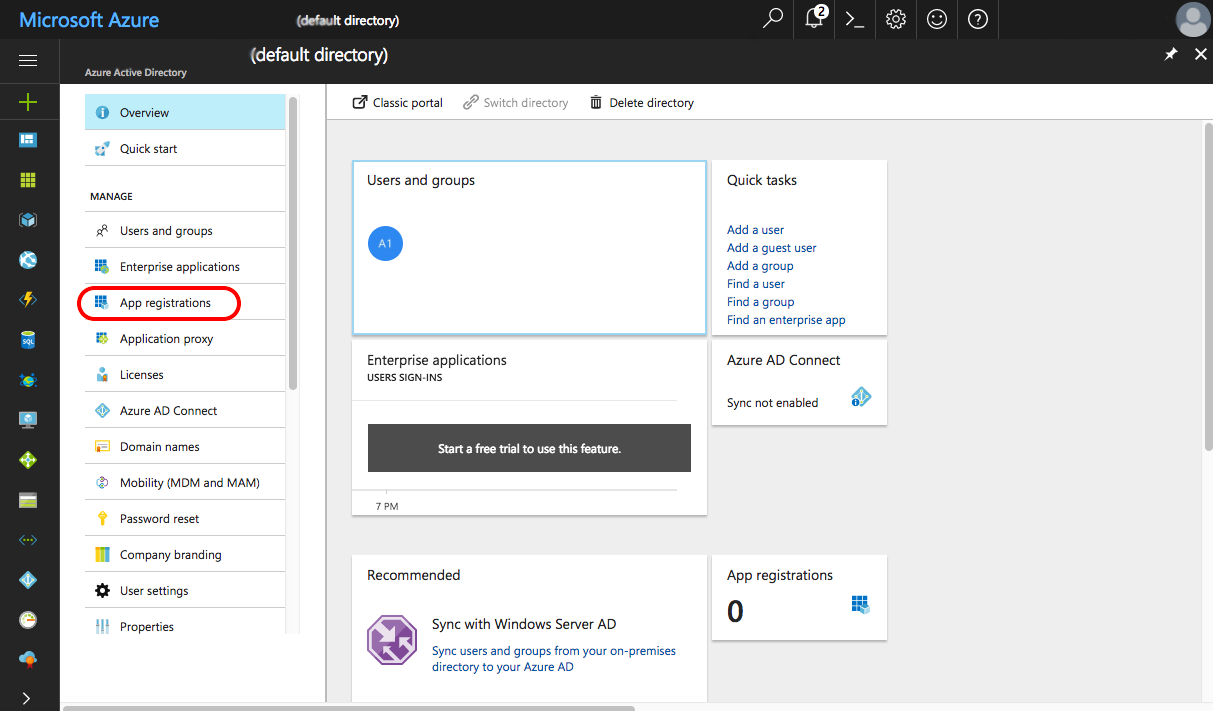
App registrations. Once you access Azure Active Directory, click on App registrations on the left-hand side navigation.
3.) App registrations (part 1 of 3)
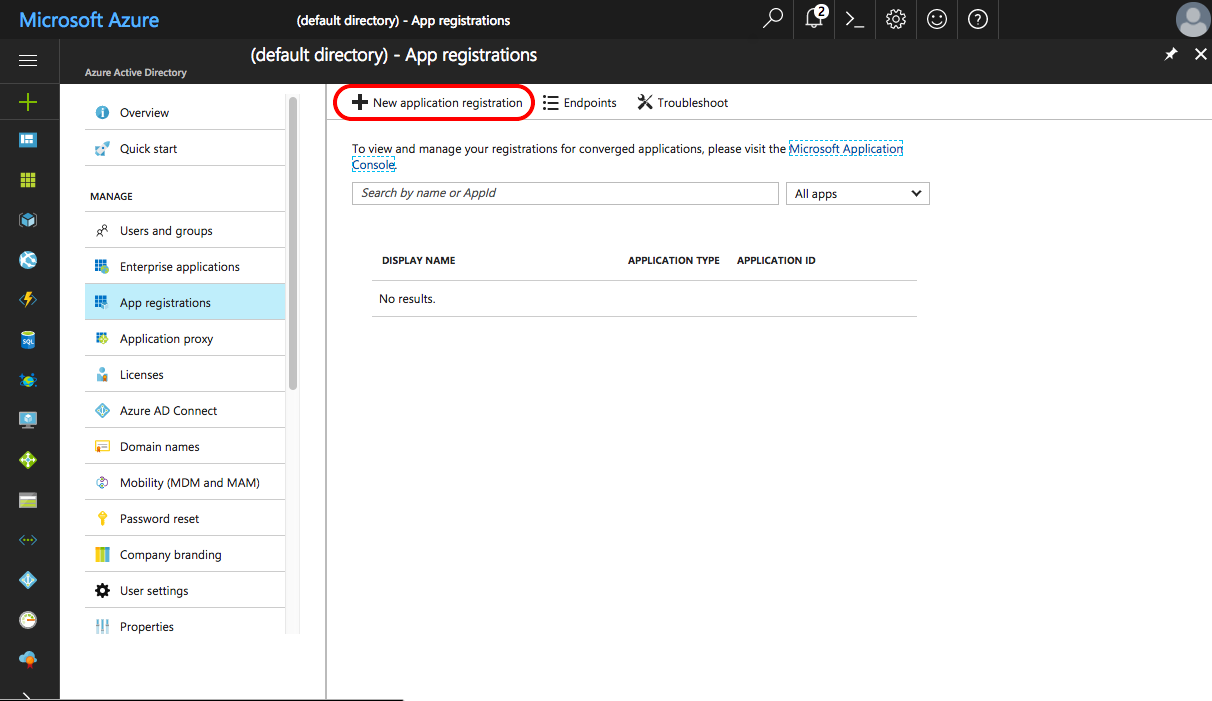
Add. Once you access App registrations, click on New application registration above the table of apps.
4.) Create
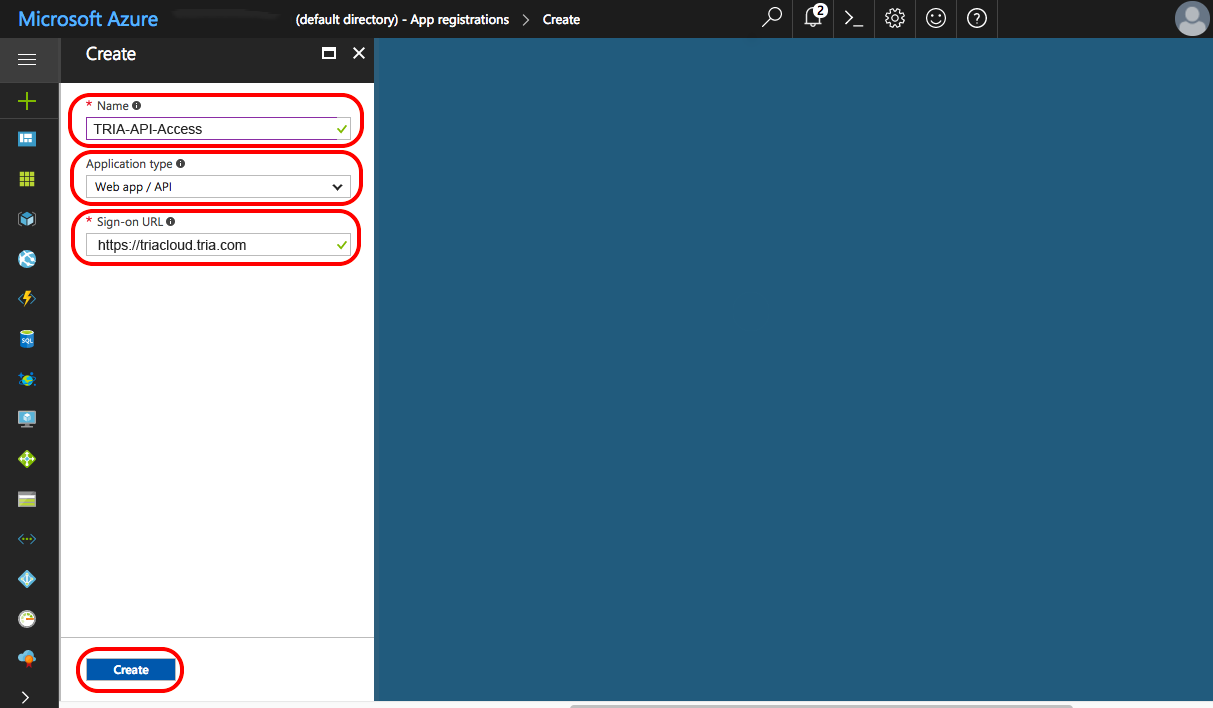
a. Name. Enter an app name to denote that this app is used for TRiA. As an example, you could name the app TRiA-API-Access. By creating a specific TRiA app, you are then able to monitor in Monitor all actions taken by TRiA, which helps you understand what TRiA is doing versus what others are doing and facilitates troubleshooting.
Application Type. Select Web app/API.
c. Sign-on URL. This sign-on will not be used, but you can name it something descriptive too, e.g., http://tria-azure.yourcompanyname.com.
Create. Click Create to create the app.
5.) App registrations (part 2 of 3)
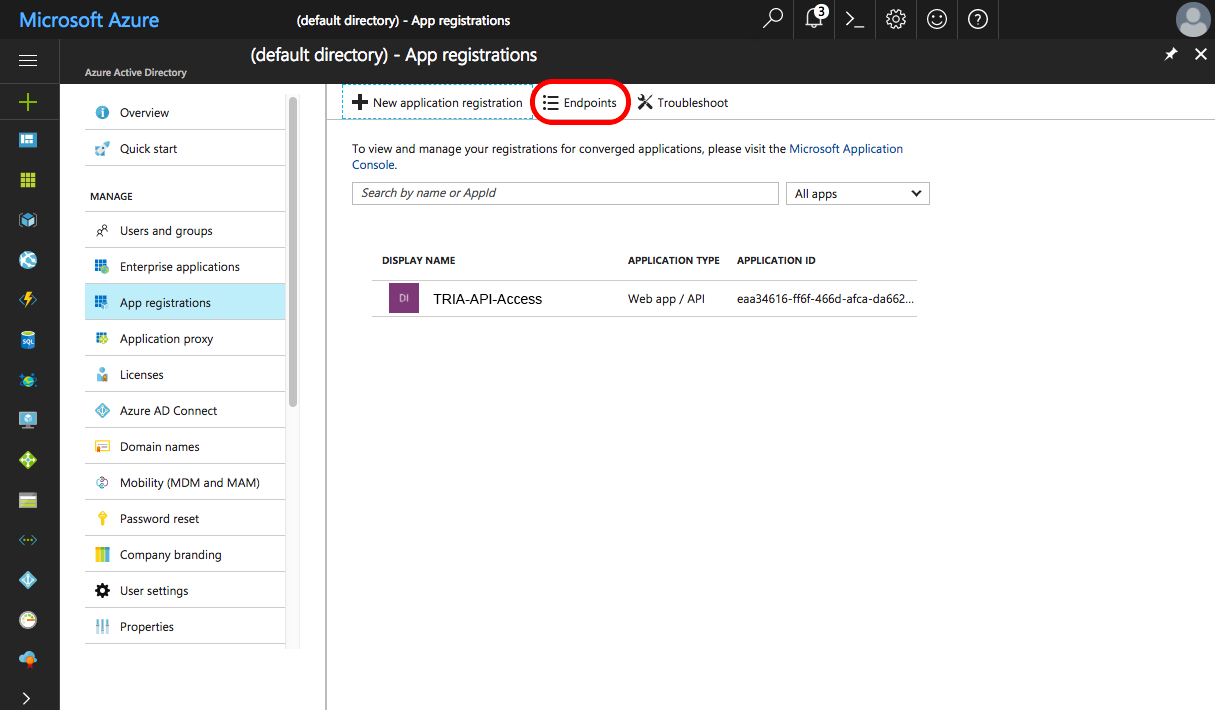
Endpoints. Once you have created the app and are returned to the App registration screen, you will retrieve the Tenant ID that you will need to add Azure to TRiA. You can do so by selecting Endpoints, which is next to New application registration.
6.) Endpoints
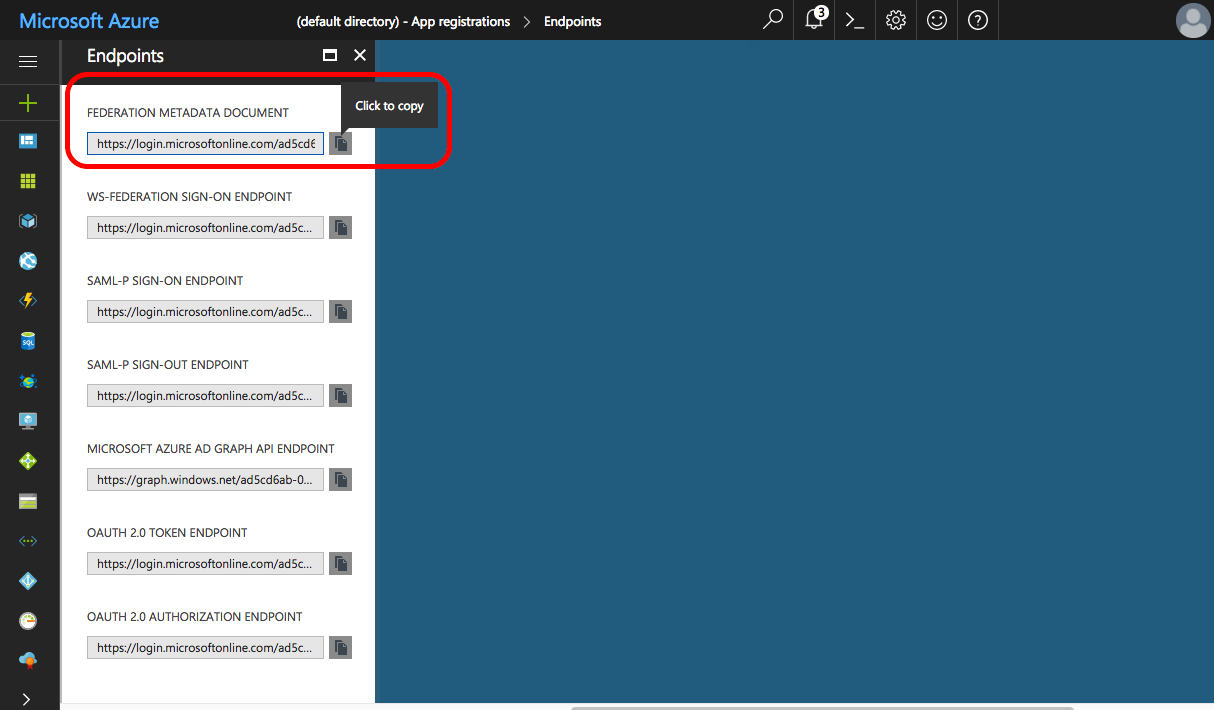
Federation Metadata Document. Once in Endpoints, copy the value under Federation Metadata Document. You will use this value to obtain the Tenant ID.
7.) Notes (part 1 of 4)
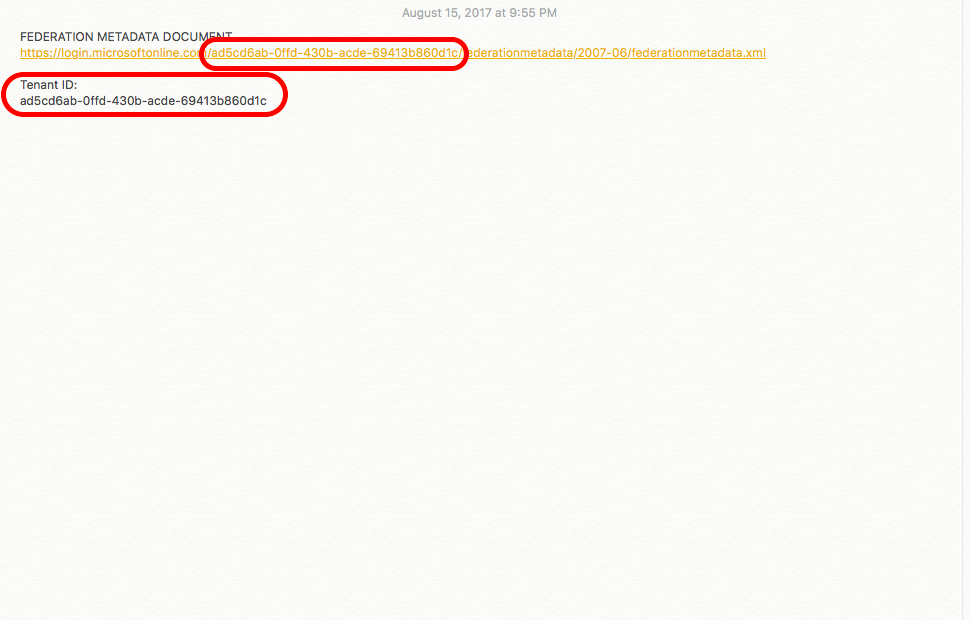
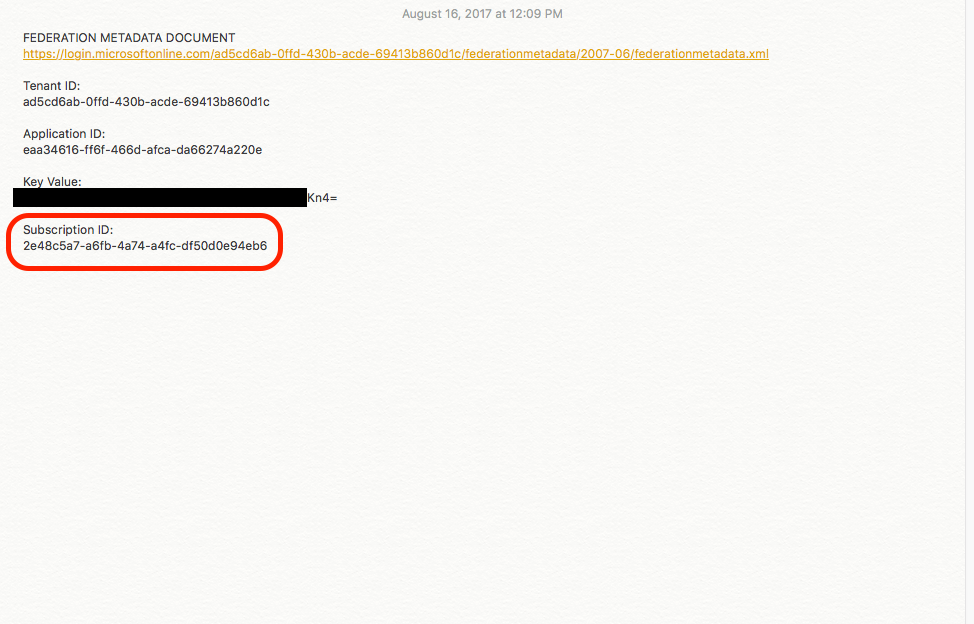
Tenant ID. Outside of your browser, using whatever application you prefer to take notes, paste the value you copied under Federation Metadata Document. To obtain the Tenant ID, you need the 36 alphanumeric between login.microsoftonline.com/ and /federationmetadata. Save that value.
8.) App registrations (part 3 of 3)
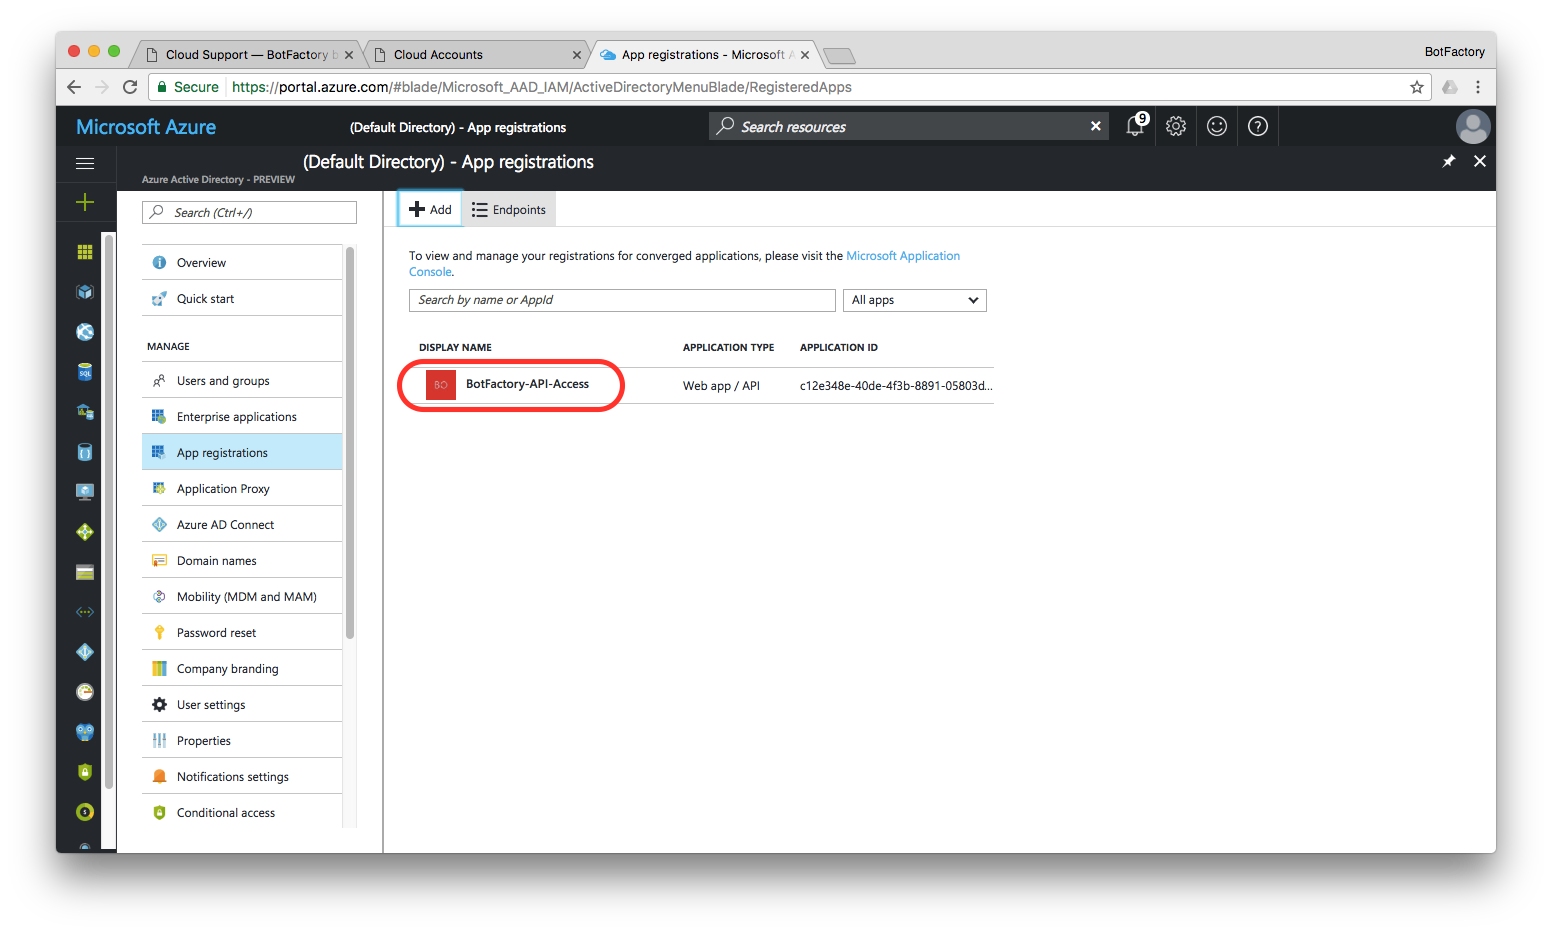
Settings. Return to App registrations and click on your created app to open up its settings.
9.) Settings (part 1 of 2)
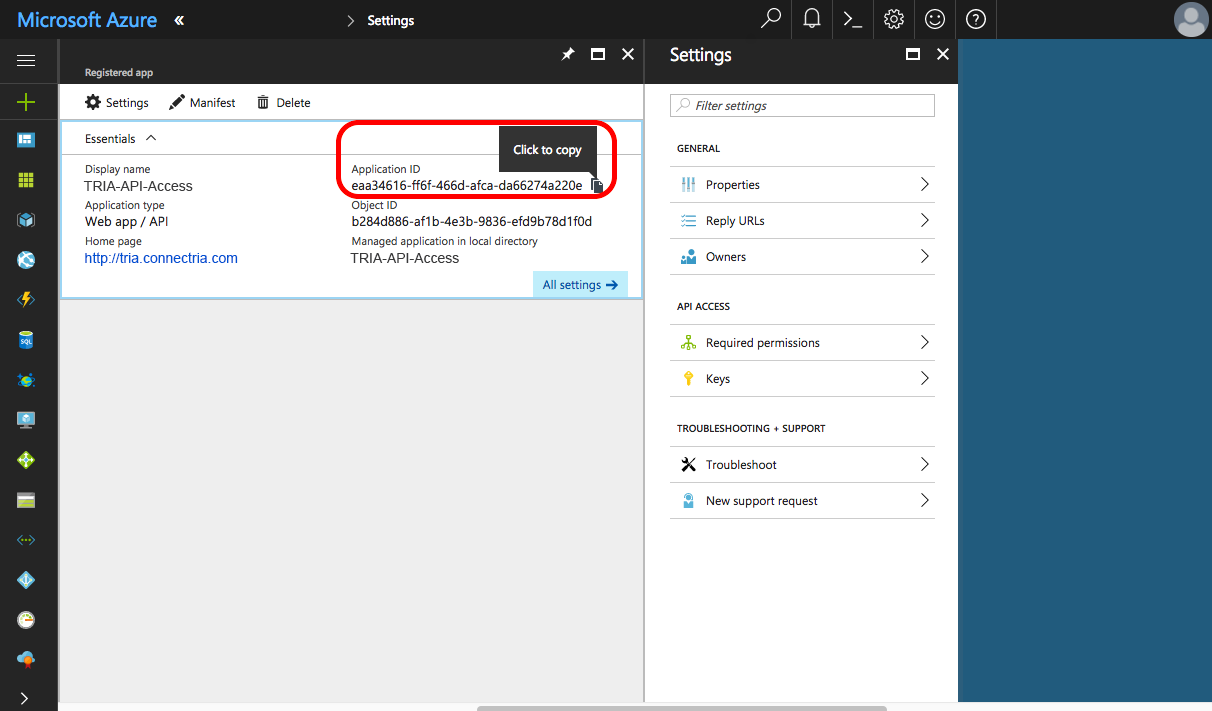
Application ID. Once you have settings open, copy the details under Application ID.
10.) Notes (part 2 of 4)
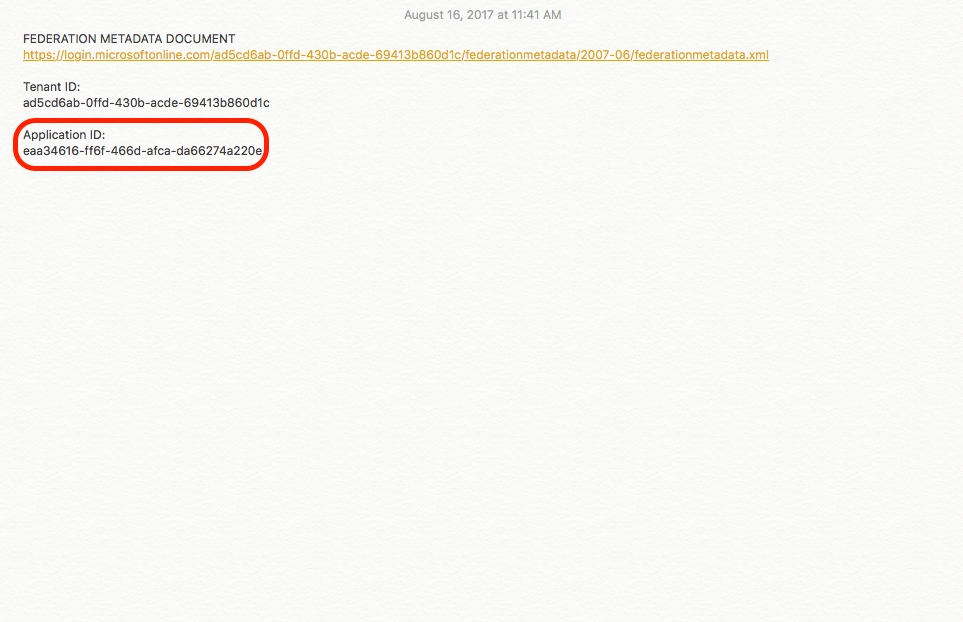
Application ID. Save the value you copied under Application ID.
11.) Settings (part 2 of 3)
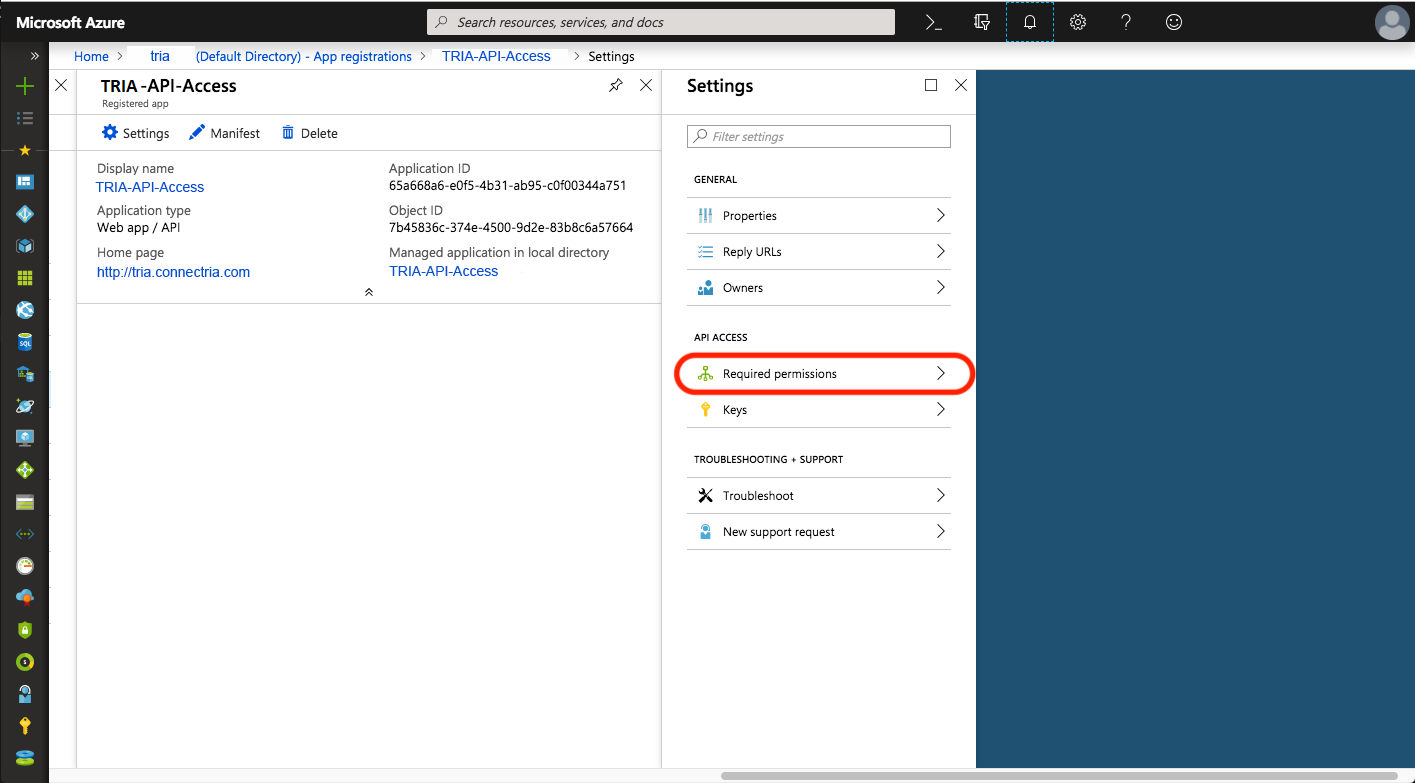
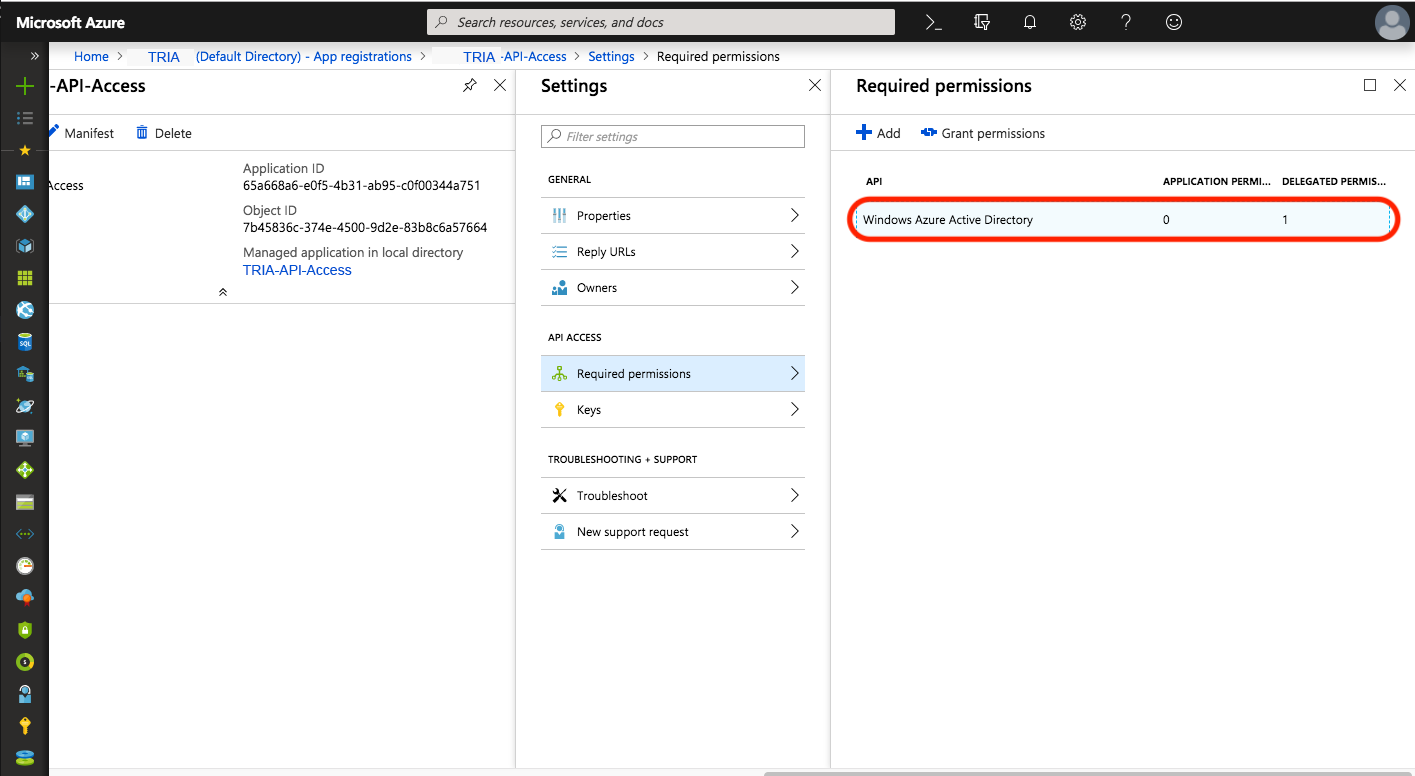
Required permissions. Return to settings and access Required permissions on the right-hand side.
- 12.) Required permissions
Click on the Windows Azure Active Directory API.
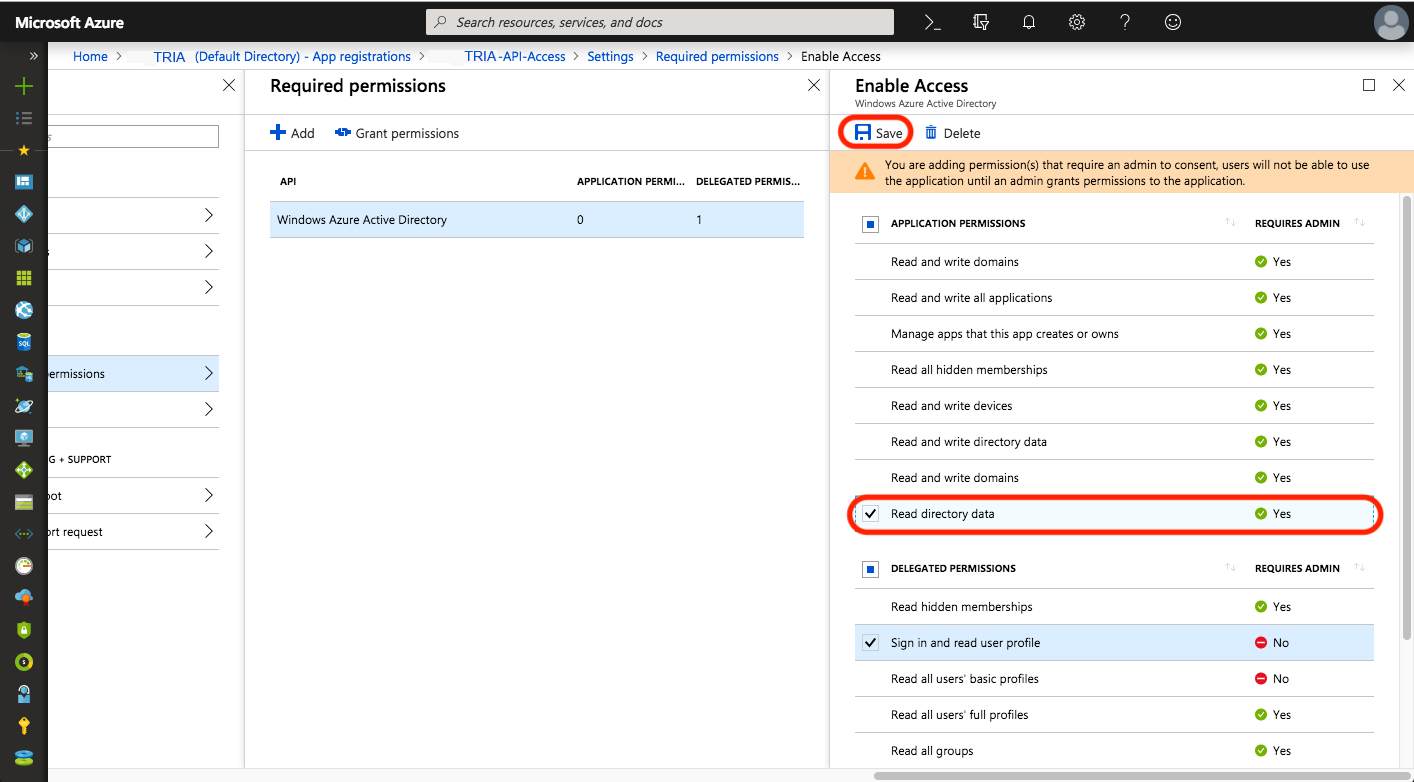
Under Application Permissions check the ‘Read directory data’ checkbox and click Save.
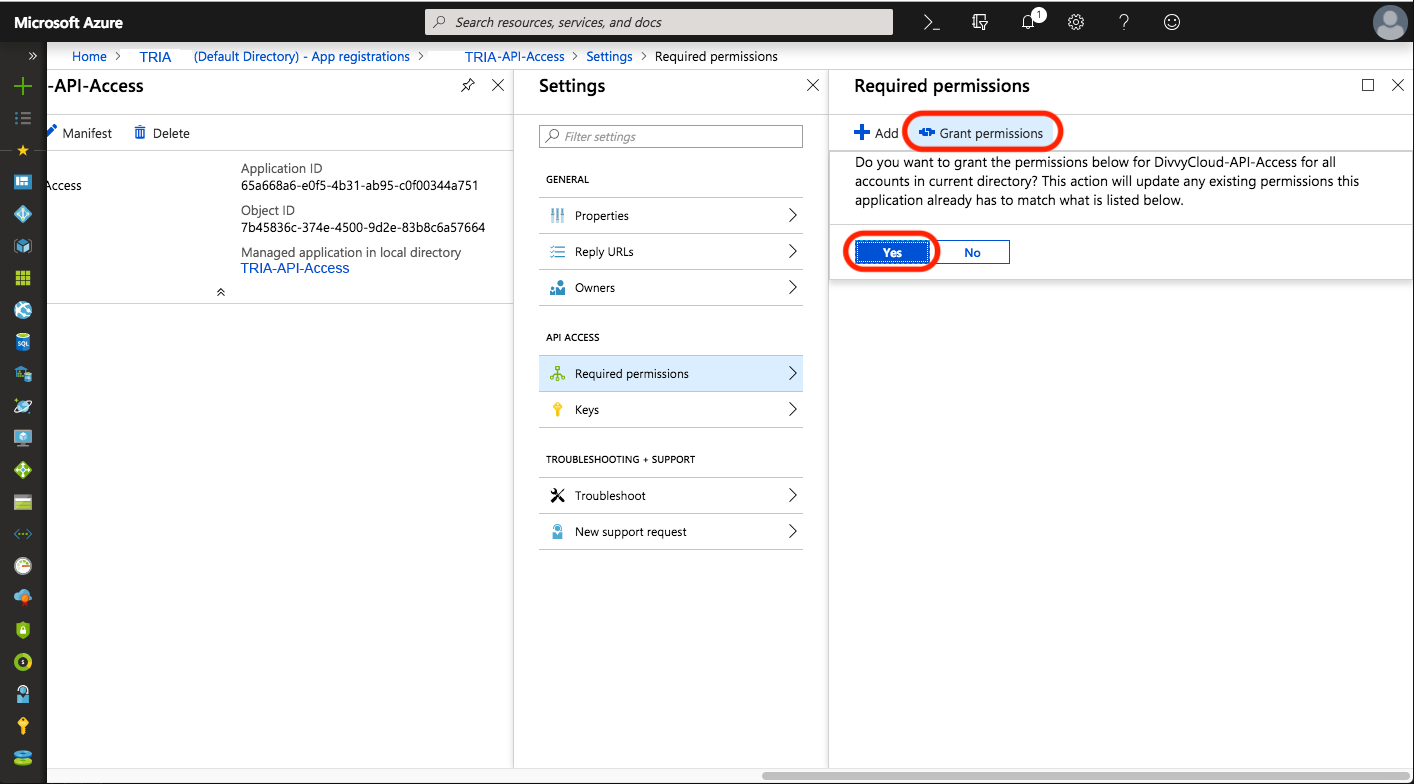
Click the Grant permissions button and then the Yes button.
13.) Settings (part 3 of 3)
Keys. Return to Settings and access Keys on the right-hand side.
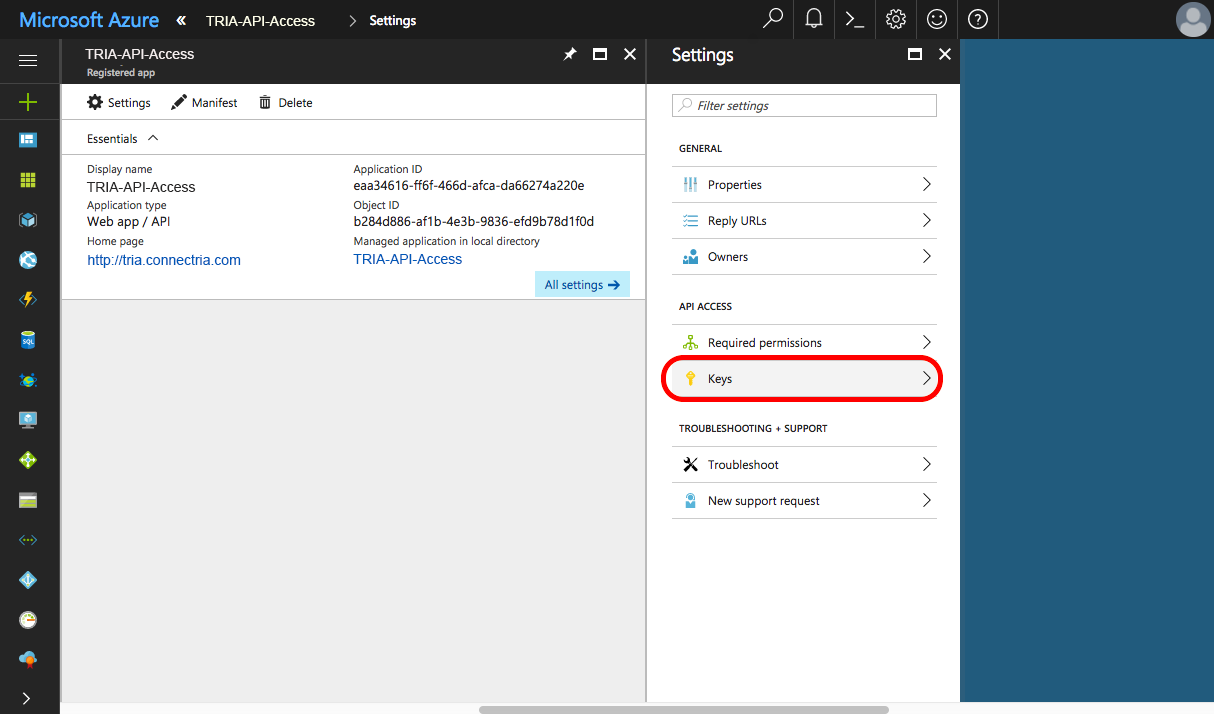
14.) Keys
a. Description. As before, enter a descriptive value that is meaningful to you, e.g., TRiA-API.
b. Expires. Select from the drop down a value, e.g, 1 year, that meets your organization’s security requirements.
c. Value.. This value, which is your key value, will not show until you click on Save. When you do, copy the value displayed here. N.b., this will be your only chance to copy this value.
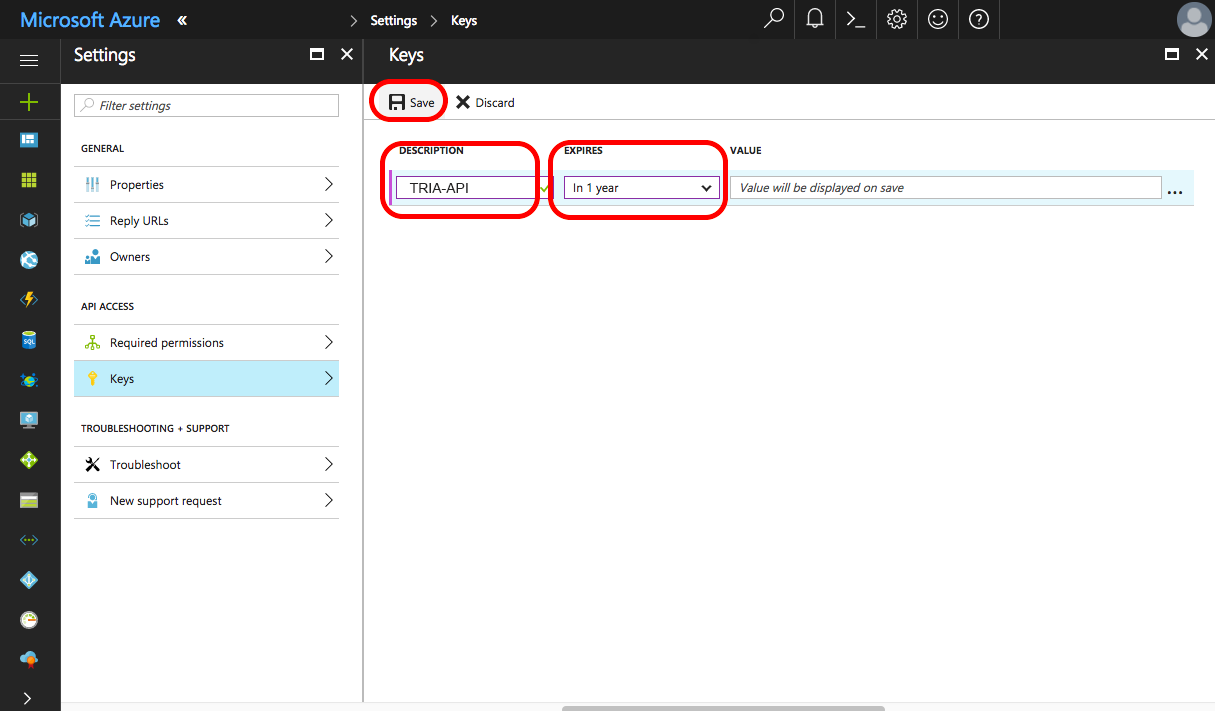
d. Save.. Click on Save, so the key value will populate the Value field. Copy the key value.
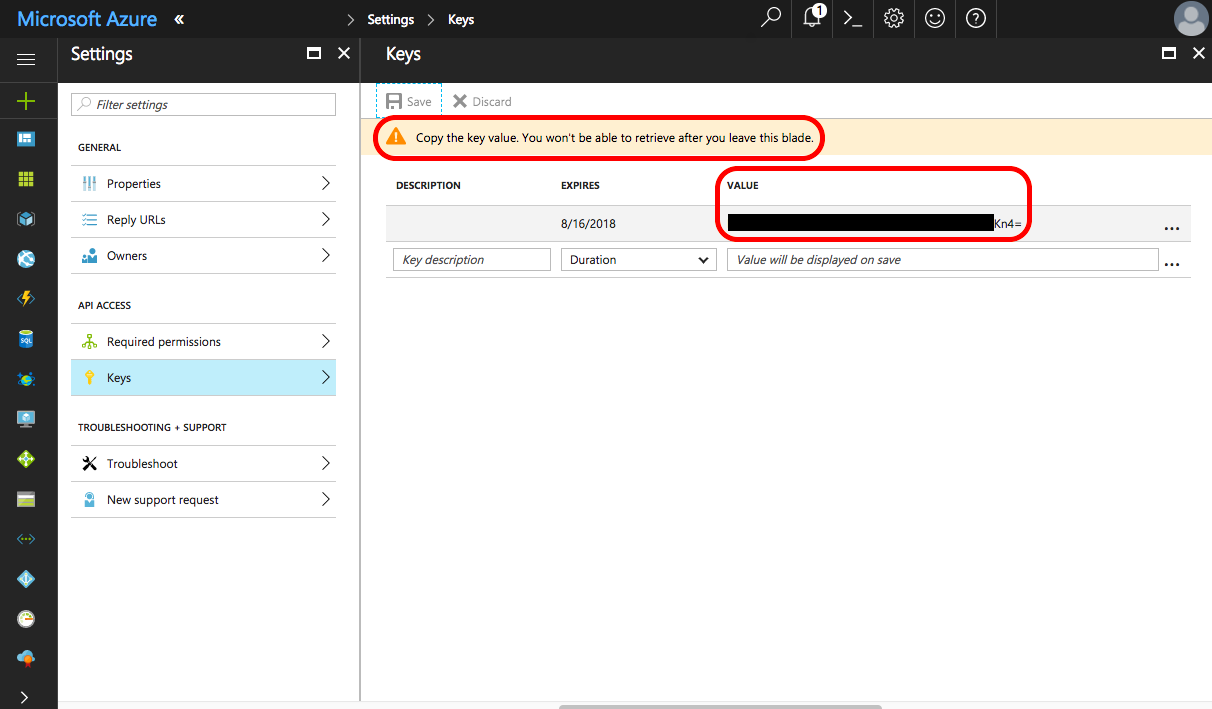
15.) Notes (part 3 of 4)
Key Value. Save the value you copied under Value.
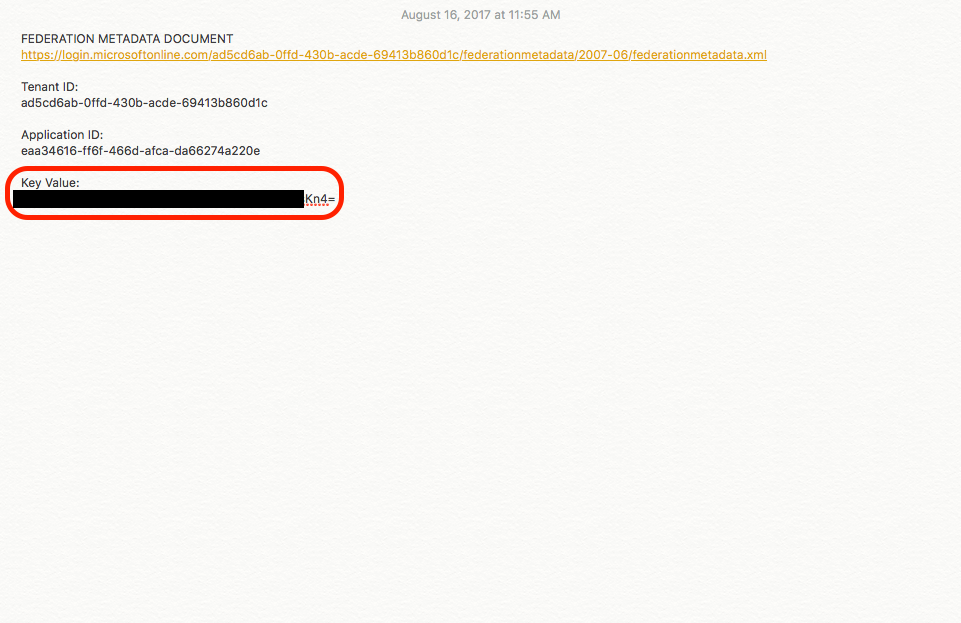
16.) Search
Subscriptions. From the main left-hand side navigation menu, select More services> to open a search box. Search for Subscriptions and select.
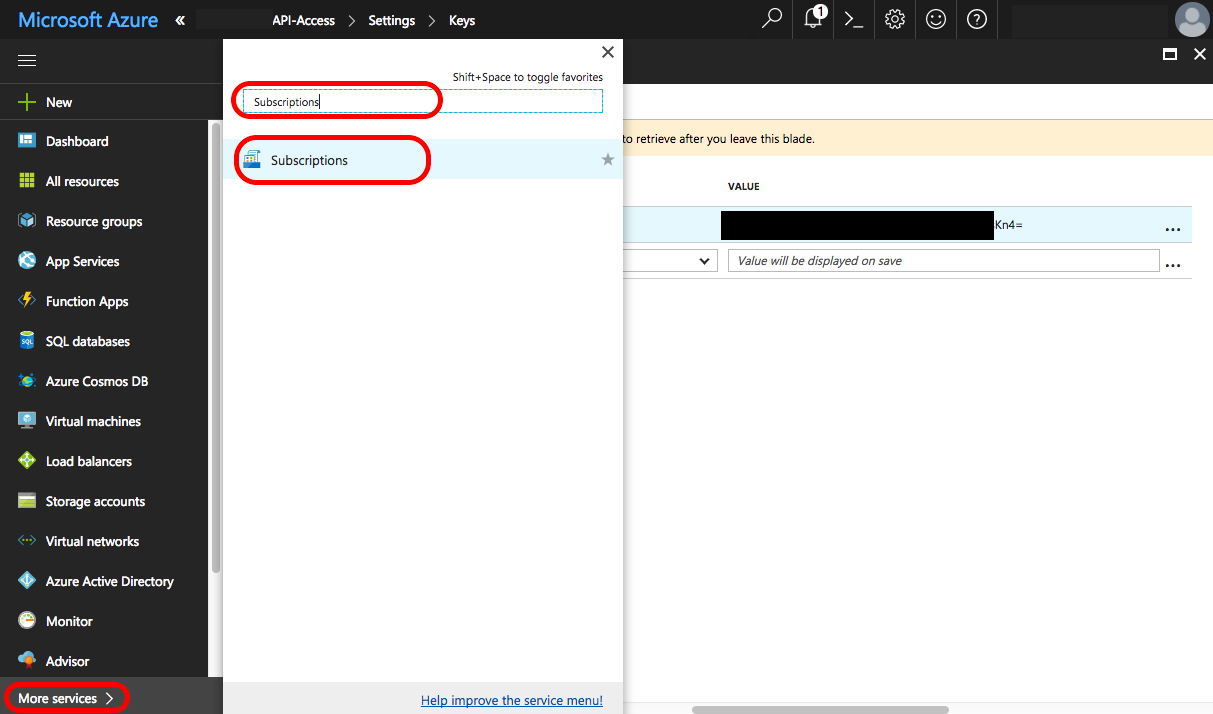
17.) Subscriptions (part 1 of 2)
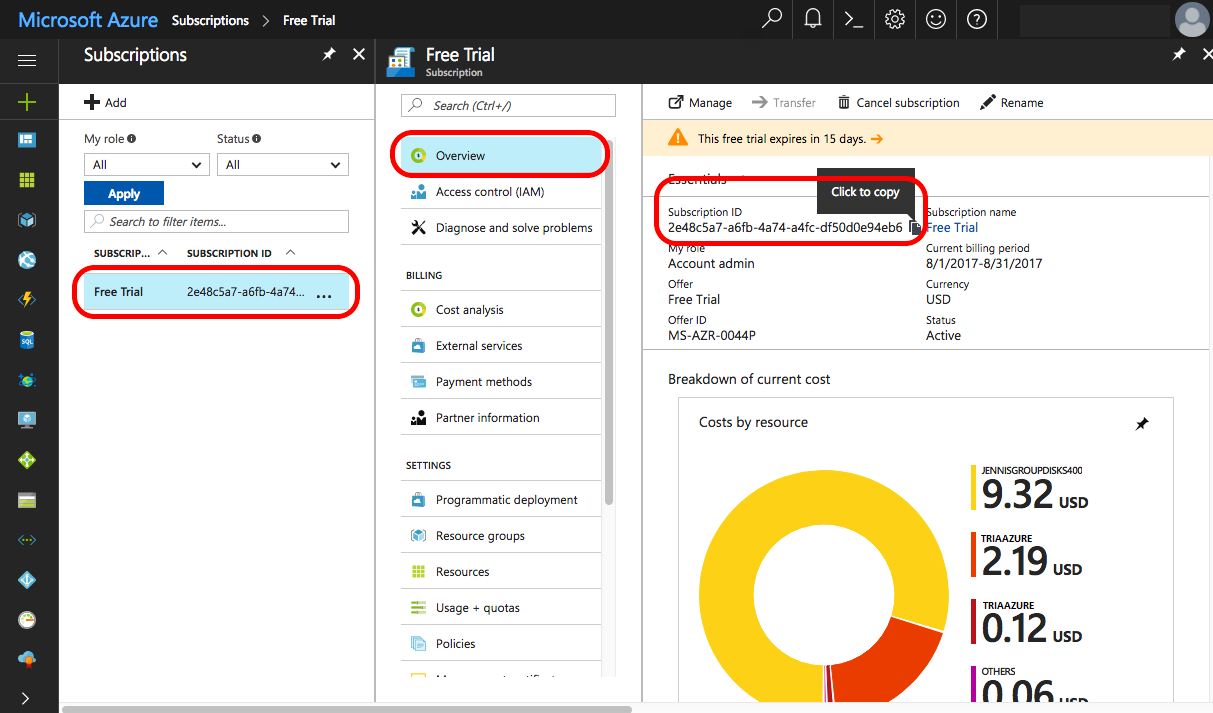
a. Overview. From Subscriptions, select the subscription that you are adding to TRiA. When you select it, the Overview and other options will open on the right-hand side.
b. Subscription ID. With Overview selected, copy the Subscription ID listed on the right-hand side.
18.) Notes (part 4 of 4)
Subscription ID. Save the value you copied under Subscription ID. You now have all of the information TRiA needs to add your Azure account, however, you still need to create a user within Azure for TRiA to use. That user can be read-only or power user.
19.) Subscriptions (part 2 of 2)
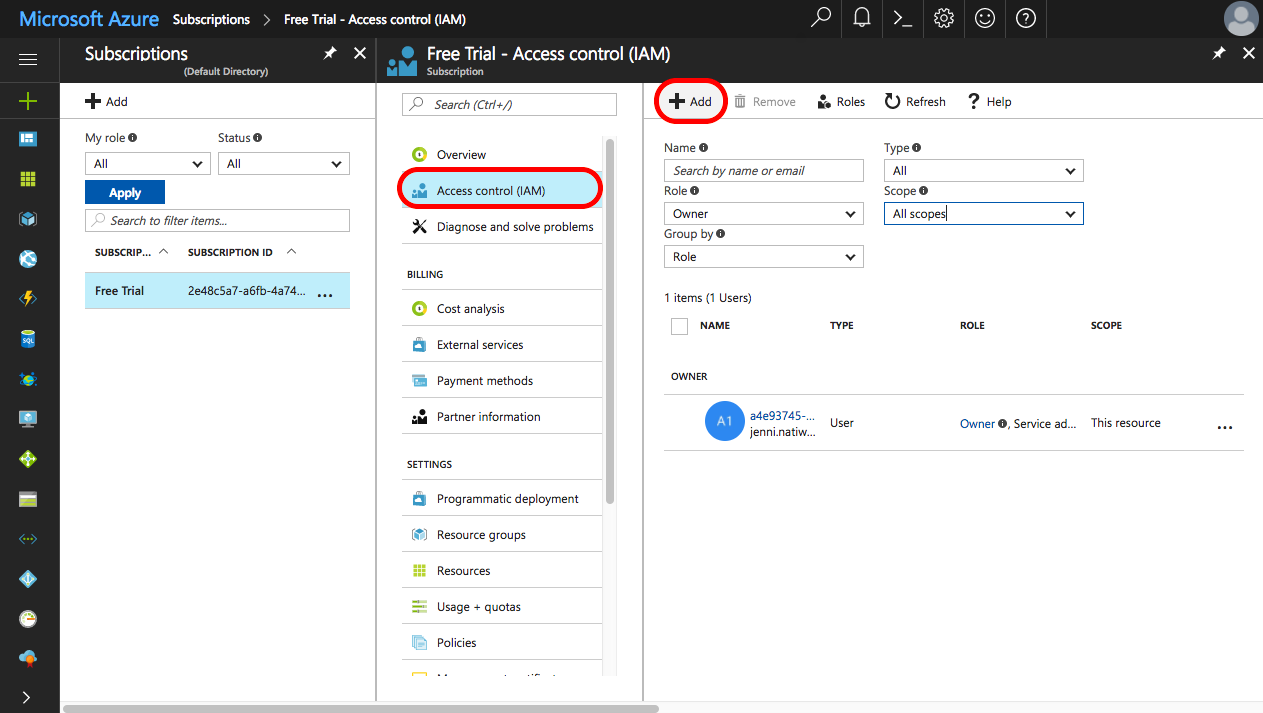
a. Access control (IAM). Returning to Subscriptions, select Access control (IAM).
Add. Select Add to create a TRiA user.
20.) Access control (IAM)
a. Select a role. Select a role. You can select either TRiA Standard User or TRiA Power User. TRiA Standard User will grant TRiA read-only permissions to supported resources, so that it can harvest data and report on it. TRiA Power User will grant TRiA all permissions to supported recources so it can act upon cloud resources in addition to monitor and report on them. You may wish to start with TRiA Standard User until you are more familiar with how to use TRiA and then change to TRiA Power User when you are ready to use all of TRiA’s capabilities.
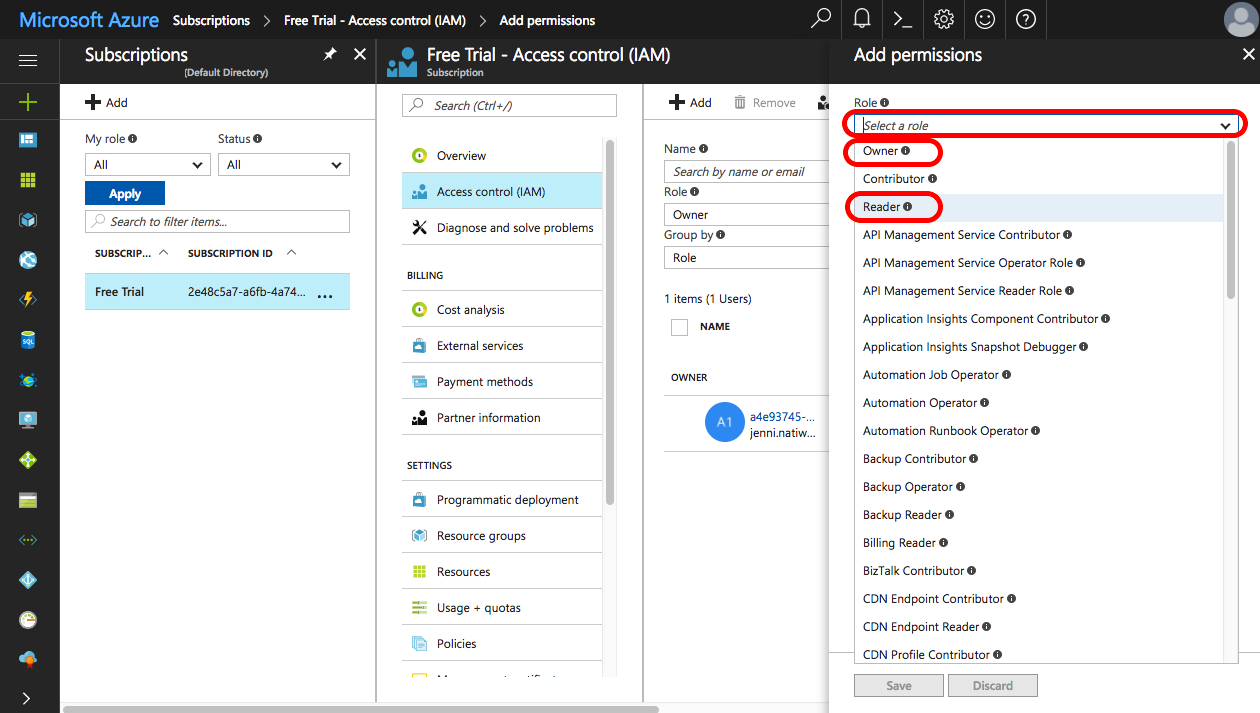
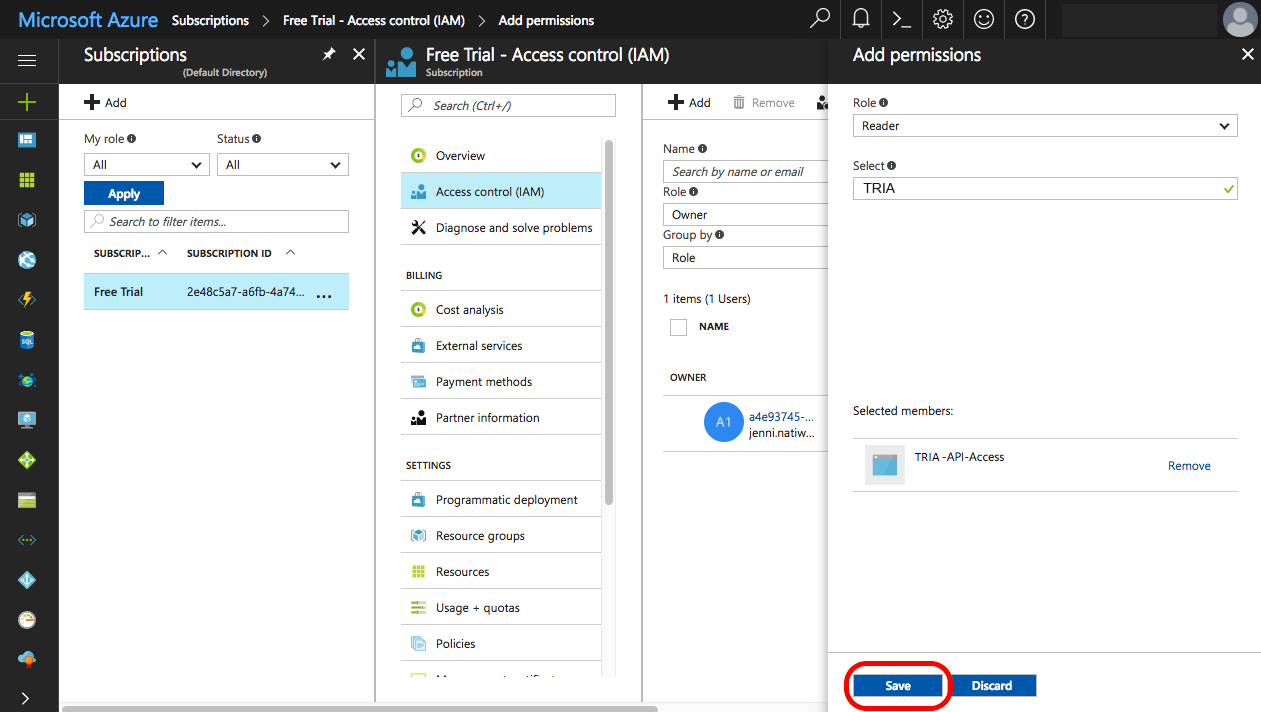
b. Add users. Search for and select the app you created in Step 4, e.g., TRiA-API-Access.
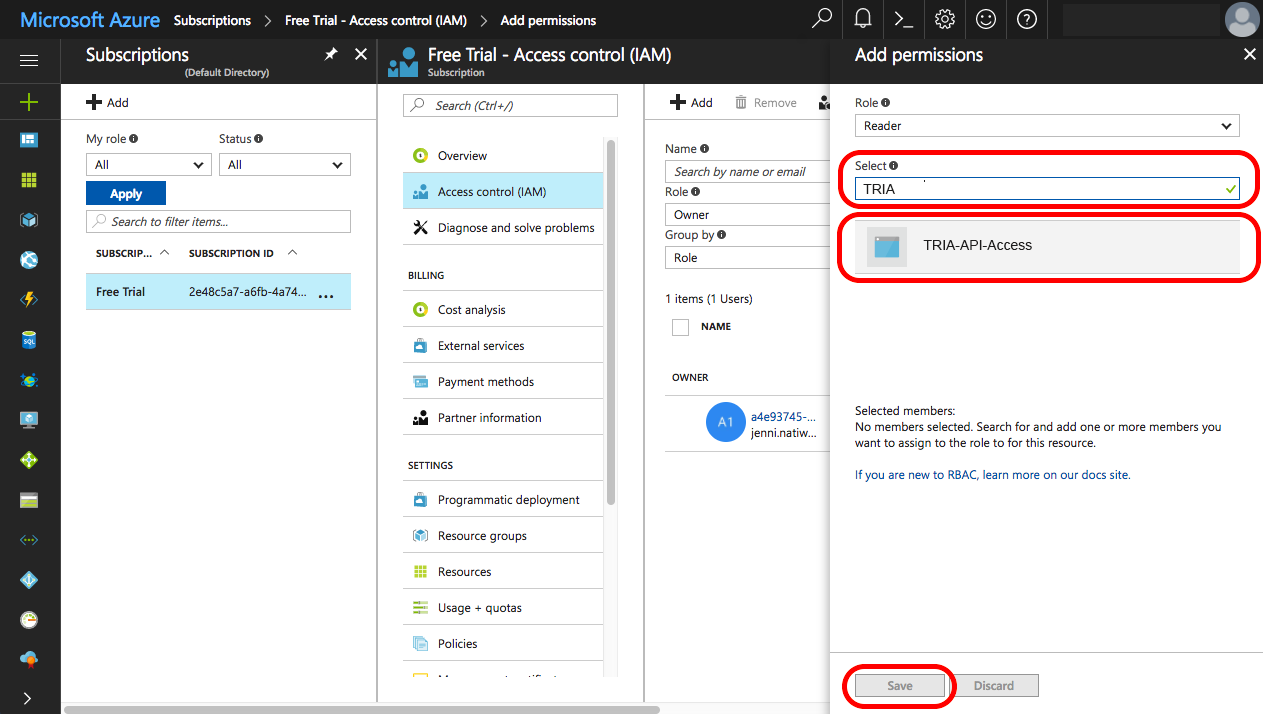
Save. Click Save.
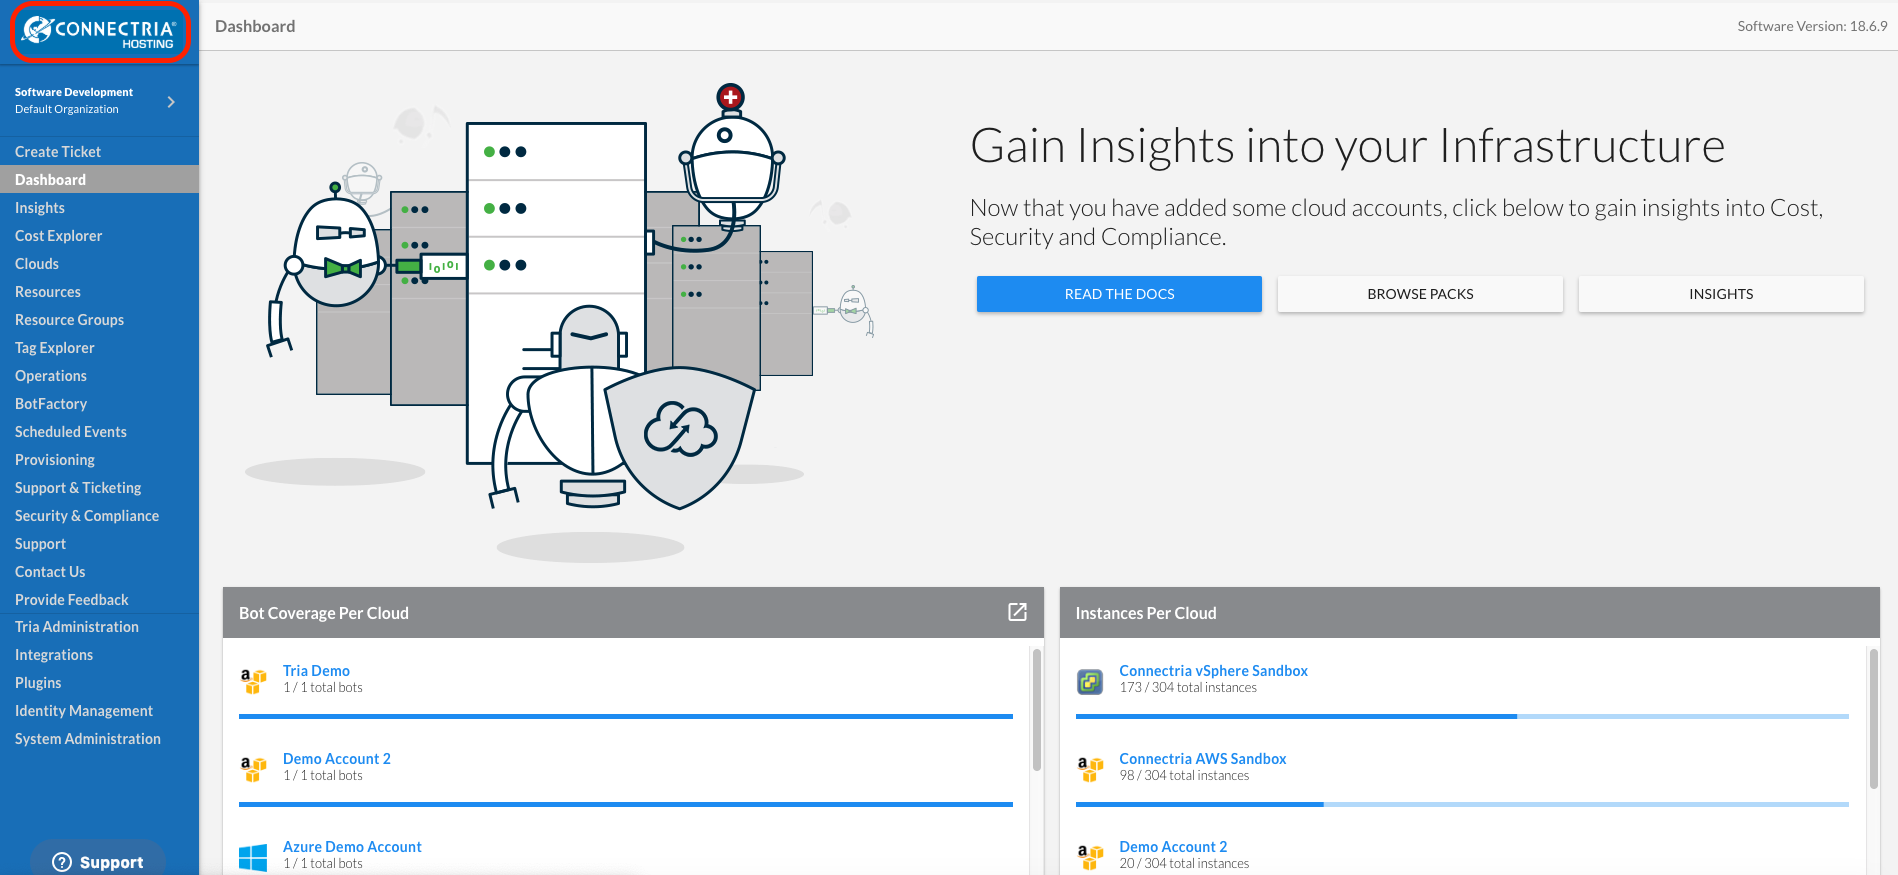
21.) TRiA
Go to your TRiA account.
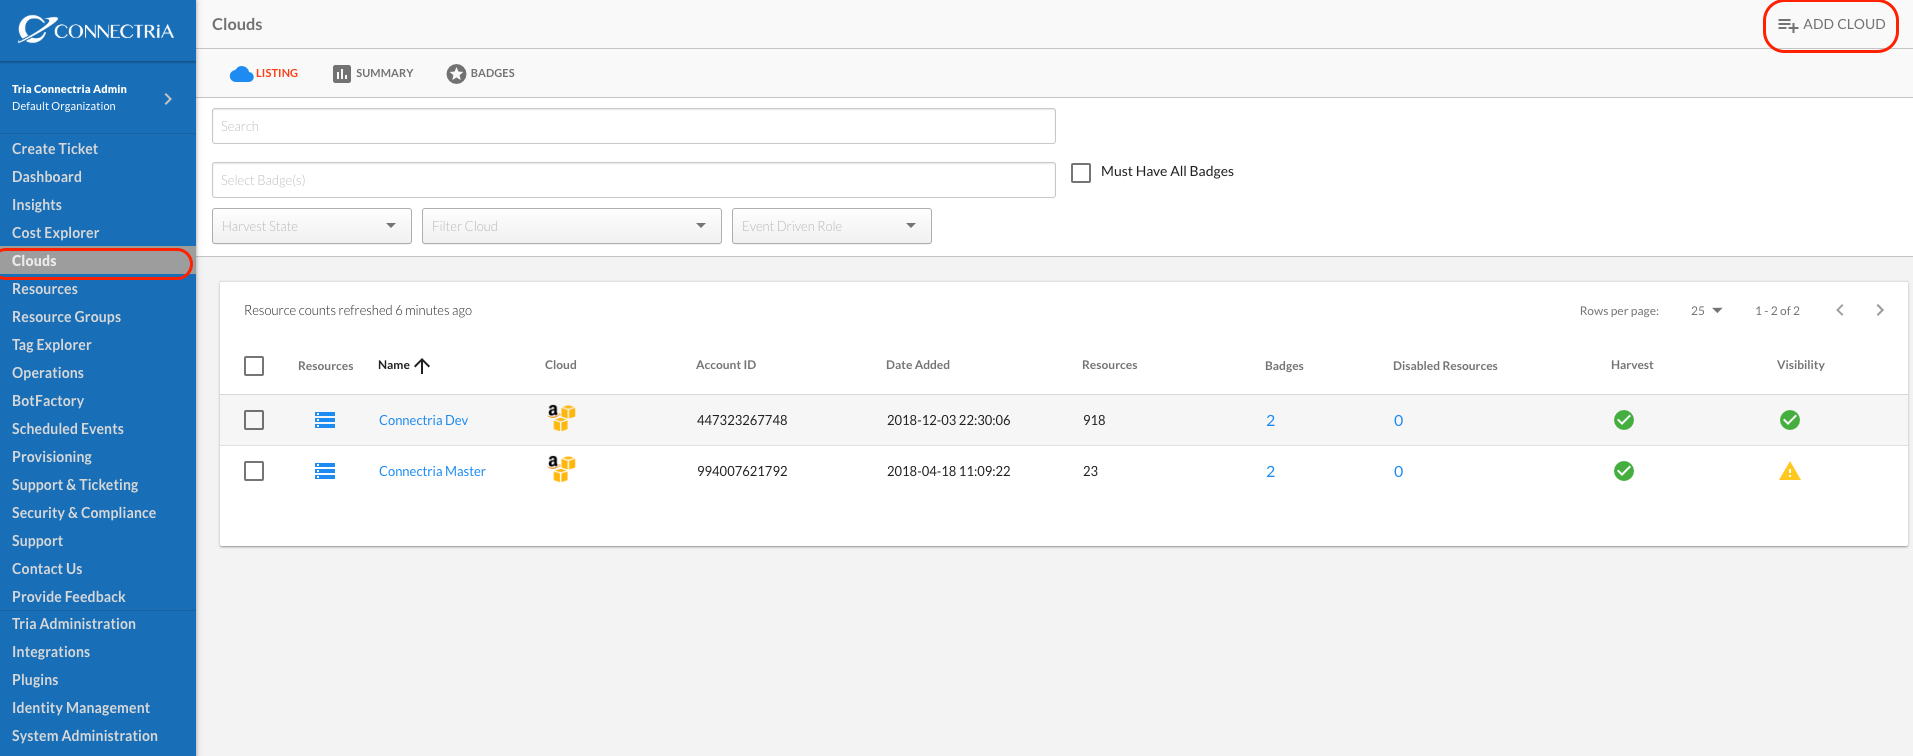
22.) Add Cloud
Navigate to Clouds on the left-hand side navigation menu. Click on Add Cloud in the upper right.
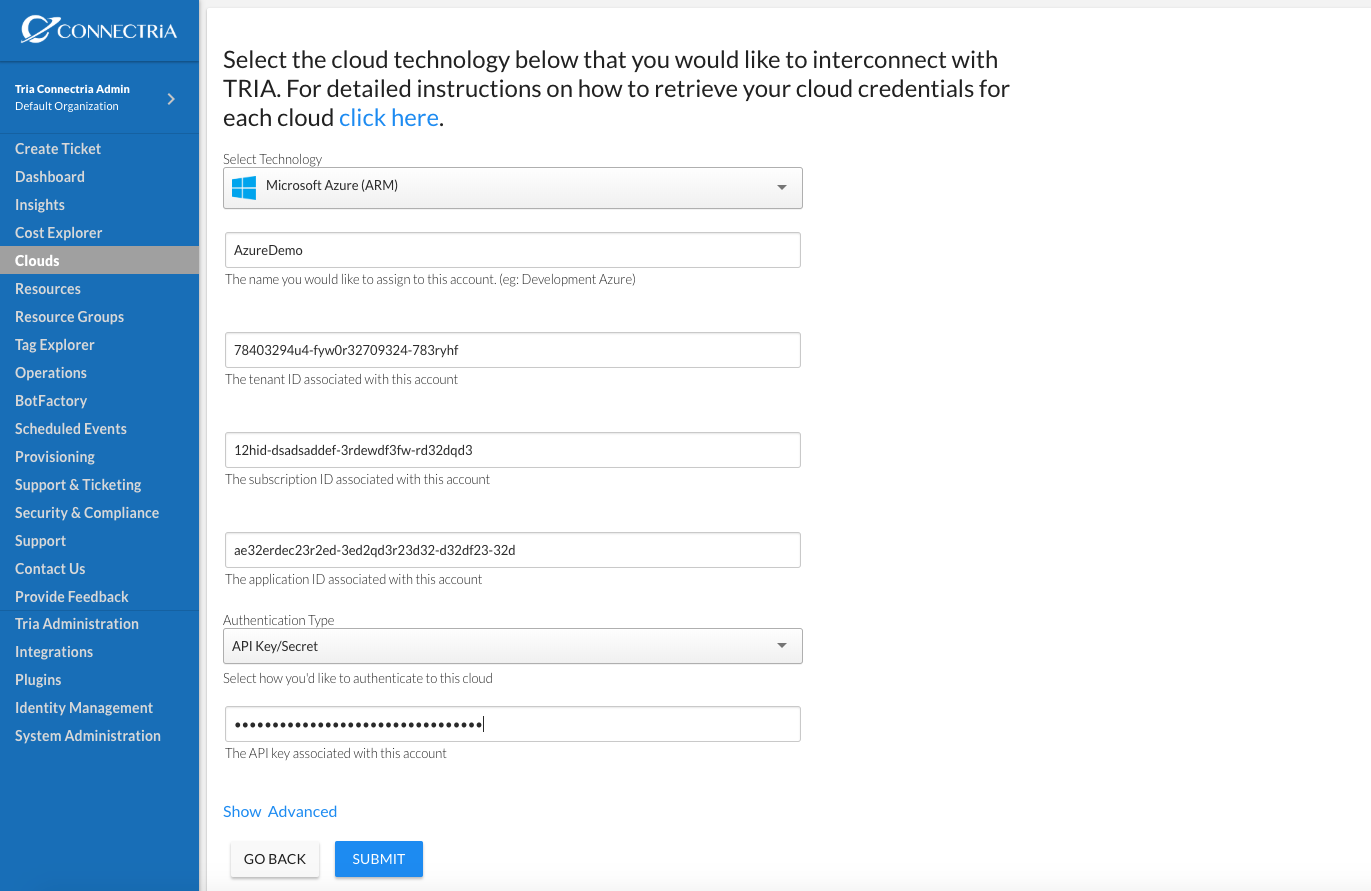
23.) Enter Cloud Information
Select Azure (ARM) in the Select Technology dropbox.
Name your cloud account.
Provide your tenant ID.
Provide your subscription ID.
Provide your application ID.
Provide your key value.
Click on Submit.
24.) Confirm
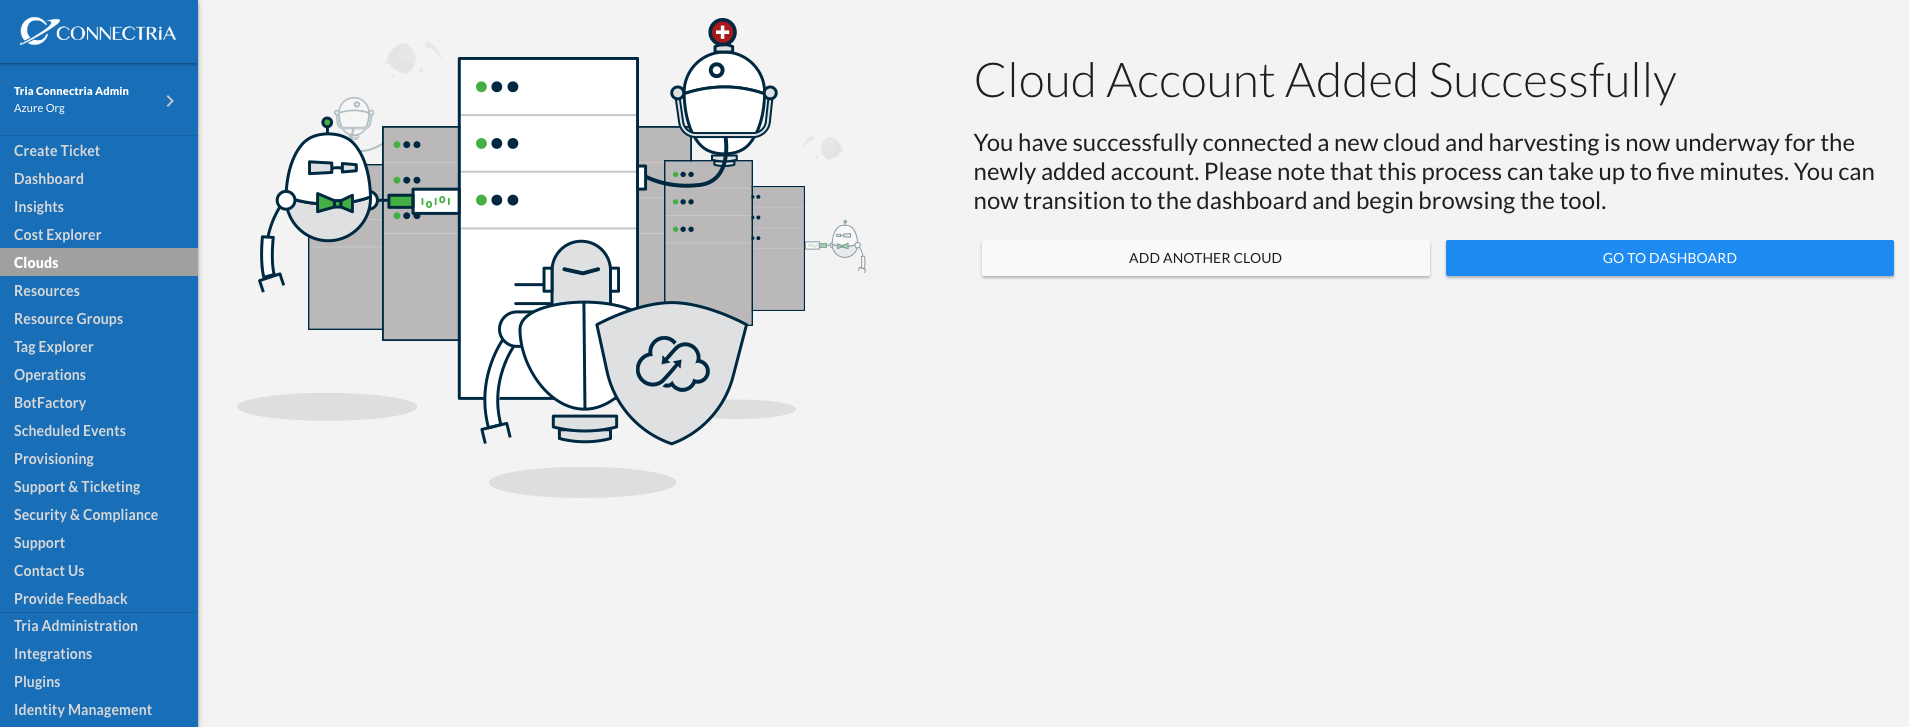
You should see a screen that indicates you have successfully added a cloud account. TRiA will begin harvesting immediately and the data should start to surface afer five minutes or so depending upon the size of your cloud account.
You can see your cloud account is added by selecting Clouds in the left-hand side navigation menu and confirming that your newly added cloud account is listed.